Setup Orin NX for using with FRAMOS-IMX678-C
This guide aims to highlight the correct procedure to configure the setup for using the FRAMOS-IMX678 cameras with the Orin NX from Nvidia + Boson for FRAMOS carrier from ConnectTech.
Info
Be sure that the Jetpack installation procedure up to the BSP installation on the setup has been completed. At this point we are ready to flash the image.
Flash the image
In the host:
- Navigate into
~/nvidia/nvidia_sdk/JetPack_6.2.1_Linux_JETSON_ORIN_NX_TARGETS/Linux_for_Tegra - Run the flash script (as root or sudo):
sudo ./cti-nvme-flash.sh cti/orin-nx/boson-orin/fsm-imx678-2cam
- Once the flash has completed, the board will reboot.
If you need more details about the complete procedure, refer to the ConnectTech tutorial.
Complete the OEM installation
Note
In order to proceed in the following steps, connect the board to a display through an HDMI cable and to a keyboard. Then disconnect the type-C cable previously connected. If the OS startup cannot be seen on the screen restart the board power supply after disconnecting the type-C cable.
After booting into the OS, follow the OEM installation with the default options.
Set the user name to icub with the hostname icub-head. Allow login without password and let the installation process finish.
After rebooting into the graphical OS, connect to an available network and run the following commands in a terminal to update the system:
sudo apt install -f
sudo apt update && sudo apt upgrade
reboot
Important
Check that the correct kernel has been installed on the board by running the following command:
ls /boot/dtb/
You should expect the following output:
kernel_tegra234-orin-nx-cti-NGX020-FSM-IMX678-2CAM.dtb
Switch profile on Orin NX
After the reboot process:
- Open a new terminal on the Orin NX and run
sudo cti-orin-nx-nano-fdt.sh - Follow the interactive procedure and select
Boson for Orin (NGX020), the profile for the FRAMOS IMX678 cameras, i.e.Base + FSM IMX678 (2 CAM)and finallyorin-nx. -
Once the script exits, run
syncandrebootto finalize the changes.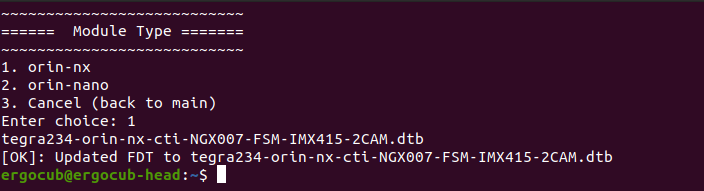
Post-flashing operations
Install FRAMOS drivers
Important
It is fundamental to note that the framos-jetson-drivers should be installed only if the BSP version installed is older than v36.4.4, since from this version the BSP and SDK already install the necessary module for configuring the camera device. Therefore, the optimal way to proceed in any case is to check if after the installation of the BSP and the configuration of the carrier the camera device is already found by running the command: ls /dev/video*. If that is not found, it is necessary to proceed with the installation of framos-jetson-drivers, otherwise you can skip the following step.
Browsing the FRAMOS Github organization, it's possible to download and install the framos-jetson-drivers and framos-jetson-libsv by following the detailed procedure in the README.md of the repositories. A further guide is proposed here to help even more in the installation.
Installation of framos-jetson-drivers
First of all, it is necessary to follow the guide to install the source code on the target system, which, in this case, is the Jetson board.
After that, you need to configure the sensor: to be more flexible, it is recommended to follow the command line procedure rather than the interactive one. For a configuration consisting of 2 FRAMOS IMX678 sensors, it is necessary to run the following command:
sudo jetson-config-camera-cli.py -n "Framos FPA-A/P22" "Framos IMX678-CAM0-2Lane" "Framos IMX678-CAM1-2Lane"
Note
The exact name of the FPA can be checked by running the command with only the -l option
sudo jetson-config-camera-cli.py -l
More information can be found in the README.md of the repository linked above.
Installation of framos-jetson-libsv
Here the procedure is easier: after cloning the repository and checkout on to the branch of your Jetpack (if you follow the instruction till this section, it would be l4t-r36.4.4), you need to run the following:
cd ~/framos-jetson-libsv/bin
sudo ./install.sh
As soon as the installation procedure has finished, please power off the Orin NX. Then plug-in your cameras to the CAM1 and CAM2 connectors, and finally power on the board again.
Warning
During the flashing procedure, the profile fsm-imx678-2cam has been selected, which means that two cameras could be used with this configuration. For this reason, only CAM1 and CAM2 connectors are enabled to read the data from the FRAMOS-IMX678, while CAM3 and CAM4 are not. Please, be sure that they are properly connected.
Check if the cameras are detected running ls /dev/video* from the command line.